How do you do, fellow kids?
A Flask API in a GitLab CI/CD crust, accompanied by its deployment on Heroku. Or how to find yourself, at 40, not having written any code since Python 1.5, up against a production-deploy problem for a demo, at an Ethereum hackathon full of German and Russian devs in hoodies.

1. A messy hackathon
It all starts with the EthParis 2019 hackathon. Of course, when someone tugs at my feelings and says “No, come on, it’ll be cool, we’ll learn a ton of stuff, doesn’t matter if your dev level is nonexistent, there’ll always be something for you to do, and besides, you’re hitting 40, you have to do this before then.” Yeah, right. Building a small API, quick and dirty, locally, no problem. Learning GitLab CI/CD and Heroku deploys in 2 hours, surrounded by German hackers, is not quite the same thing.
Why this article? Simply because, under stress, after a liter of Red Bull, I would have loved to find exactly what follows. (OK, I probably searched badly. Lord Google and the angels of the Documentation — capital D, out of respect — generally always have the answers to our questions.)
Anyway.
Goal: have a basic building block of a Flask API hosted in production (via Heroku), with a database, and with a CI (via GitLab).
2. The project
To put this into practice, a simple API that lets you add song titles to a list (you could call that a playlist, since it’s a list of tracks to play — clever), built with Flask, with data persisted in a PostgreSQL database. Nothing complicated. Just 3 routes.
The code is available here.
Prerequisites (ultra obvious):
- Python 3.6 installed
- PostgreSQL installed
- A GitLab account with an empty repo
- A Heroku account
What follows was done and tested under Macintosh OS Mojave 10.14.6. Differences may remain under Windows (almost certainly) or Linux (few).
3. Deploying locally
The project uses:
- Flask (of course), a Python web microframework
- Flask-script, to run the tests, migrate the database, and start the app
- Gunicorn, for the production server
- Unittest, for the unit tests
- Autoenv, to start the virtual environment automatically and manage the environment variables
- SQLAlchemy and psycopg2, for the connection to the DB
The project persists data in a PostgreSQL database, so the first thing to do is create 2 databases on your machine, one for dev and one for test:
$ psql
# create database songlist;
CREATE DATABASE
# create database songlist_test;
CREATE DATABASE
# quit
To start the project, after cloning, go into the directory, create a Python virtualenv, then activate it:
$ python3 -m venv env
$ source env/bin/activate
Now, install the packages listed in requirements.txt:
$ pip install --upgrade pip
$ pip install -r requirements.txt
You may get an error installing psycopg2 if you’re not on a Mac, because here we use the psycopg2 package binaries. If that’s the case, use the psycopg2 package by replacing the line in requirements.txt.
Time for Autoenv! Create a .env file at the project root and add the following lines:
source env/bin/activate
export APP_SETTINGS="core.server.config.DevelopmentConfig"
export SECRET_KEY="UnePhraseSecreteBadass"
export DATABASE_URI="postgresql://postgres:@localhost/songlist"
export DATABASE_URI_TEST="postgresql://postgres:@localhost/songlist_test"
and then add it to the path:
$ echo "source `which activate.sh`" >> ~/.bashrc
$ source ~/.bashrc
With Autoenv, a cd into the directory automatically runs the .env script, which activates the virtual environment and sets the environment variables locally (but not only locally — we’ll see that later).
Since you’ve already activated your Python venv, a simple $ source .env is enough.
Autoenv really isn’t essential. A plain bash script would do.
The subject isn’t the Flask project as such, so if this is the first time you’re getting near one, here’s what there is to know:
- The
coremodule contains the modulescore.server(your app) andcore.tests(the… unit tests). - Several configurations are provided: development, test, and production, described in the
core.server.configmodule. The config is used via theAPP_SETTINGSenvironment variable. SECRET_KEYis your Flask app’s security key.DATABASE_URI, surprise, is your local database (and_TESTis the test one).
Careful: depending on the environment, if you set a password on your PostgreSQL database, remember to add your login:password to the DATABASE_URI and DATABASE_URI_TEST URIs.
Here we use flask-script, which lets you manage running the tests, creating, migrating, and upgrading the database, and starting the server. Start with the database:
(env)$ python manage.py db init
(env)$ python manage.py db migrate
(env)$ python manage.py db upgrade
Running the unit tests is very simple:
(env)$ python manage.py test

test_app_is_development (test_config.TestDevelopmentConfig) ... ok
test_app_is_production (test_config.TestProductionConfig) ... ok
test_app_is_testing (test_config.TestTestingConfig) ... ok
test_add_new_song (test_routes.TestRoutes)
test_for_adding_a_song ... ok
test_add_song_already_added (test_routes.TestRoutes)
test_for_adding_an_already_added_song ... ok
test_clear (test_routes.TestRoutes)
test_for_get_all_songs ... ok
test_getall (test_routes.TestRoutes)
test_for_get_all_songs ... ok
test_getall_emptylist (test_routes.TestRoutes)
test_for_get_all_songs_with_empty_list ... ok

----------------------------------------------------------------------
Ran 8 tests in 0.250s

OK
To start the server locally:
(env)$ python manage.py runserver
Your app can be tested on port 5000 of your environment with Postman or curl:
$ curl -X POST -H "Content-Type: application/json" -d '{"title": "Atomic - Blondie","year" : 1979}' http://localhost:5000/add
$ curl http://localhost:5000/getlist
$ curl -X DELETE http://localhost:5000/clear
Now, on to the serious stuff.
4. GitLab CI
GitLab offers CI/CD tools, even for freemium accounts. Your CI/CD pipeline is defined in a gitlab-ci.yml file at the root of your project. It contains the instructions that will be executed by the GitLab Runner, possibly with conditional instructions on the failure or success of a job. Jobs, then. What are they? Well, they’re the different instructions or tasks the Runner is going to execute.
Job1:
    type: type de job
    service:
    - image Docker utilisée par le script (comme par exemple une db)
    variables:
    - variable1 (qui va etre utilisée par le service au-dessus)
    - variable2
    script:
    - tâche1
	- tâche2
    - tâche3
 Job2:
 	type: type de job
    script:
    - tâche1
	- tâche2
    - tâche3
For each task, you can set the parameters that change its behavior.
script(surprise) defines the script to executebefore_script/after_scriptdefines instructions to execute (surprise) before or after the task runsimageandservicedefine the use of Docker containersonly/except: a limit on whether the task runs or not
The list of parameters is pretty long, with plenty to play with.
About variables Tasks can of course access environment variables. They can be declared via the web UI, Settings > CI/CD, or directly in the gitlab-ci.yml file. A fair number of predefined variables are available directly. Through these environment variables you’ll be able to enter the Heroku API keys and the application’s configuration values.
For our project, the .gitlab-ci.yml file will contain 3 jobs:
- test, for the tests (shocking), run on every commit
- staging, for a pre-prod on a Heroku instance, for every commit on master
- prod, for a production deploy on a Heroku instance as soon as the master branch is tagged
Ready? Let’s go. Create a .gitlab-ci.yml file at the root and add the jobs below.
The test job
test:
  services:
  - postgres:latest
  variables:
    POSTGRES_DB: songlist_test
    POSTGRES_USER: runner
    POSTGRES_PASSWORD: "pass"
  script:
  - apt-get update -qy
  - apt-get install -y python-dev python-pip
  - pip install -r requirements.txt
  - export SECRET_KEY="UnePhraseSecreteBadass"
  - export DATABASE_URI="postgres://$POSTGRES_USER:$POSTGRES_PASSWORD@postgres:5432/songlist_test"
  - export DATABASE_URI_TEST="postgres://$POSTGRES_USER:$POSTGRES_PASSWORD@postgres:5432/songlist_test"
  - export APP_SETTINGS="core.server.config.TestingConfig"
  - python manage.py test
First point: GitLab will use a PostgreSQL image to run the tests, via the given service (postgres), and will set that service’s variables: db name, user, and password.
On every commit, GitLab runs the script defined, that is:
- create a container in which it installs a Python environment
- install the project’s packages from requirements.txt
- set the environment variables specific to GitLab (
SECRET_KEYandAPP_SETTINGS) - set the URI of the database being tested here
- run the tests with the command
python manage.py test
Shall we?
$ git add .
$ git commit -m "ajout gitlabci"
$ git push origin master
In principle, you should see the job succeed:

The sharper ones among you will have noticed that I only created a single branch here, master, which is of course bad practice. You can specify that jobs run on a precise branch with the only parameter, if you feel like it, as done below with the staging and prod jobs.
The staging job
staging:
  type: deploy
  script:
  - apt-get update -qy
  - apt-get install -y ruby-dev
  - gem install dpl
  - dpl --provider=heroku --app=votre_nom_app_staging --api_key=$HEROKU_STAGING_API_kEY
  only:
  - master
For every commit on the master branch, specified by the only parameter, GitLab will run, after the test job, its Ruby deployment script dpl, with the following parameters:
provider: Heroku here, if you’ve been followingapp: the name of your staging app at your providerapi_key: the key that lets Heroku authorize the deployment by GitLab onto this app (we’ll see that later)
The production job
production
  type: deploy
  script:
  - apt-get update -qy
  - apt-get install -y ruby-dev
  - gem install dpl
  - dpl --provider=heroku --app=votre_nom_app --api_key=$HEROKU_PROD_API_kEY
  only:
  - tags
For every tagged version, specified by the only parameter, GitLab will run, after the test job, its Ruby deployment script dpl, with different parameters:
provider: still Herokuapp: the name of your prod app at your providerapi_key: the key that lets Heroku authorize the deployment by GitLab onto this app (we’ll see that right after)
That’s the quick tour of getting a CI/CD started with GitLab. It can, and should, be filled out with the tools available on the platform:
- Caching, which saves time by keeping content from jobs already run
- Auto DevOps, which offers a range of DevOps features from building through monitoring
- Chat Ops, which lets jobs interact with chat channels such as Slack
- Or a very handy Docker integration
Pipeline progress and history can be viewed from the web UI (my passion: watching pipelines and jobs run and… fail. Note: remember to turn off the email notifications!).
5. Heroku
For those who don’t know it, Heroku is a US PaaS company, Platform as a Service, which, as the name suggests, provides a turnkey production platform. For me, Heroku has a lot of advantages when you want to get an app into production fast: no long configuration, as with a dedicated server, and no migraine from reading the AWS catalog before you can pick the service that fits. On top of that, the free account already lets you have plenty of fun, and your platform is easily scalable.
In practice, Heroku lets you create an automated deployment pipeline (pre-prod, prod) connected to your version-control software. One very nice feature on offer (but not covered here) is Review Apps. On every pull request, a Heroku app is created and lets you test the PR in production. Heroku can host applications in the main current languages and frameworks: Node.js, Ruby, Java, PHP, Python, Go, Scala, Clojure. And the olive in the vodka martini: the documentation is very thorough.
The first step is installing the CLI, which lets you play with Heroku directly from the console (after creating an account):
$ heroku login
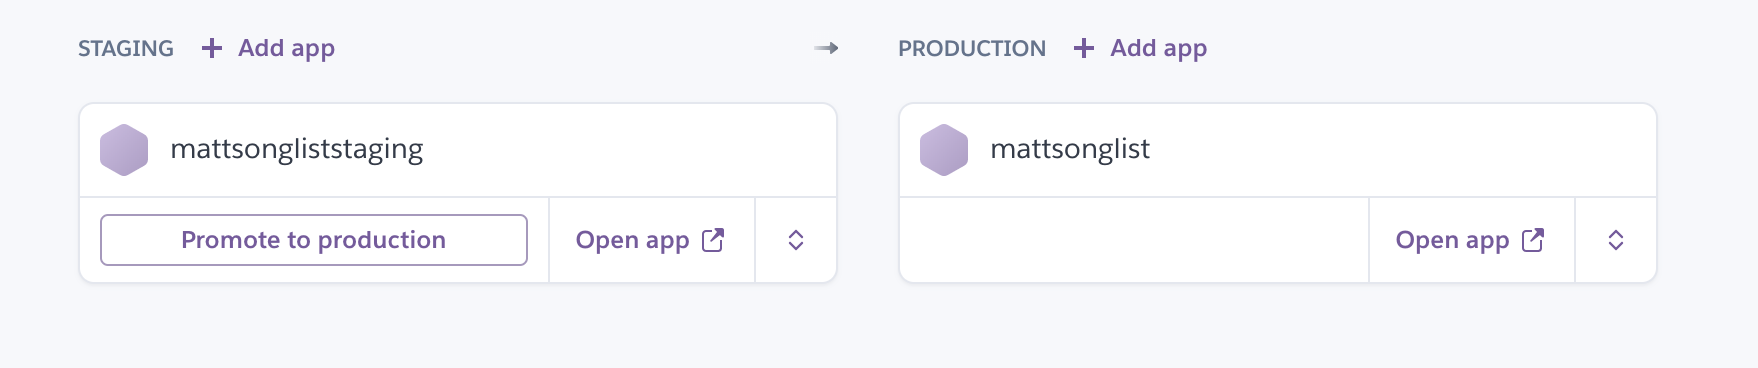
Now, if you’ve been following, you need to create 2 instances, staging and prod. That’s 2 apps, named votre_nom_app_staging and votre_nom_app, which will make up your pipeline.
$ heroku create votre_nom_app
$ heroku create votre_nom_app_staging
$ heroku pipelines:create songlist --app=votre_nom_app
Heroku will ask you to choose dev, staging, or prod for the app votre_nom_app
? Stage of votre_nom_app (Use arrow keys)
development
staging
❯ production
And now, add votre_nom_app_staging to the pipeline as the staging app
$ heroku pipelines:add songlist -a votre_nom_app_staging
Nice. Your pipeline is ready. All that’s left is to link GitLab and Heroku.
You remember that in the gitlab-ci.yml you had specified two API keys, HEROKU_PROD_API_KEY and HEROKU_STAGING_API_KEY. The value is retrieved from the Heroku UI under manage account>API Key, and declared on GitLab under Settings > CI/CD > Variables, for each of the keys.
API Key:

GitLab fields:
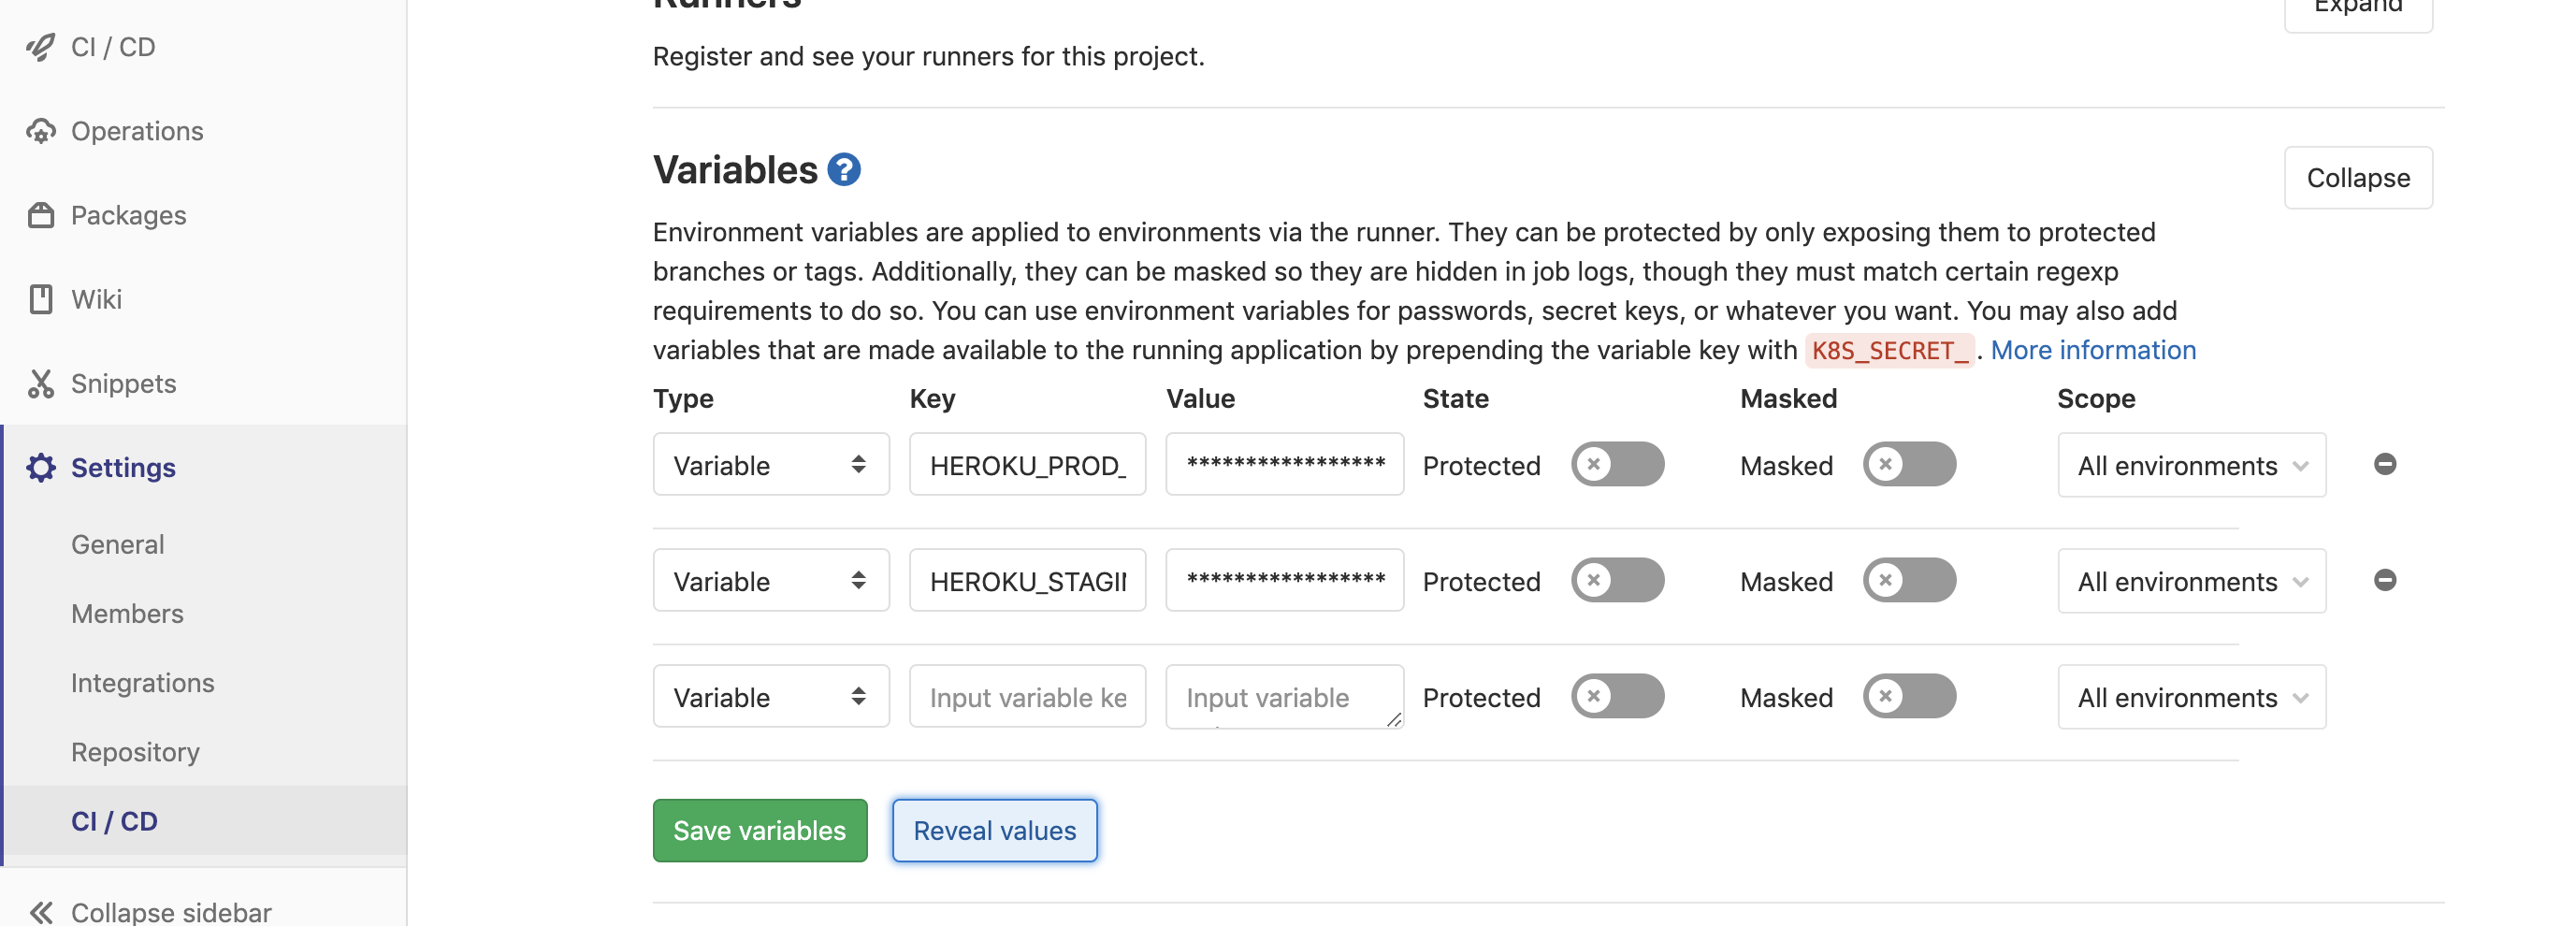
All aboard, Simone (yeah). GitLab will now be authenticated on Heroku.

To configure your app for staging and prod, just add the following commands via the Heroku CLI (and/or add them directly in the .env):
heroku config:set APP_SETTINGS="core.server.config.ProductionConfig" --app votre_nom_app_staging
heroku config:set APP_SETTINGS="core.server.config.ProductionConfig" --app votre_nom_app
heroku config:set SECRET_KEY="UnePhraseSecreteBadass" --app votre_nom_app
heroku config:set SECRET_KEY="UnePhraseSecreteBadass" --app votre_nom_app_staging
Anything missing?
Yes! The databases. Heroku offers managed PostgreSQL databases, with free tiers (hobby-dev), which we’re going to use here. Heroku will spin up 2 databases and give you the credentials to connect them to your apps.
They’re created with the Heroku CLI, one for staging, one for prod:
$ heroku addons:create heroku-postgresql:hobby-dev -a votre_nom_app_staging
$ heroku addons:create heroku-postgresql:hobby-dev -a votre_nom_app
Once the databases are created, grab the credentials from the Heroku UI for each app, and declare the database URIs via the CLI (and/or add them directly in the .env):
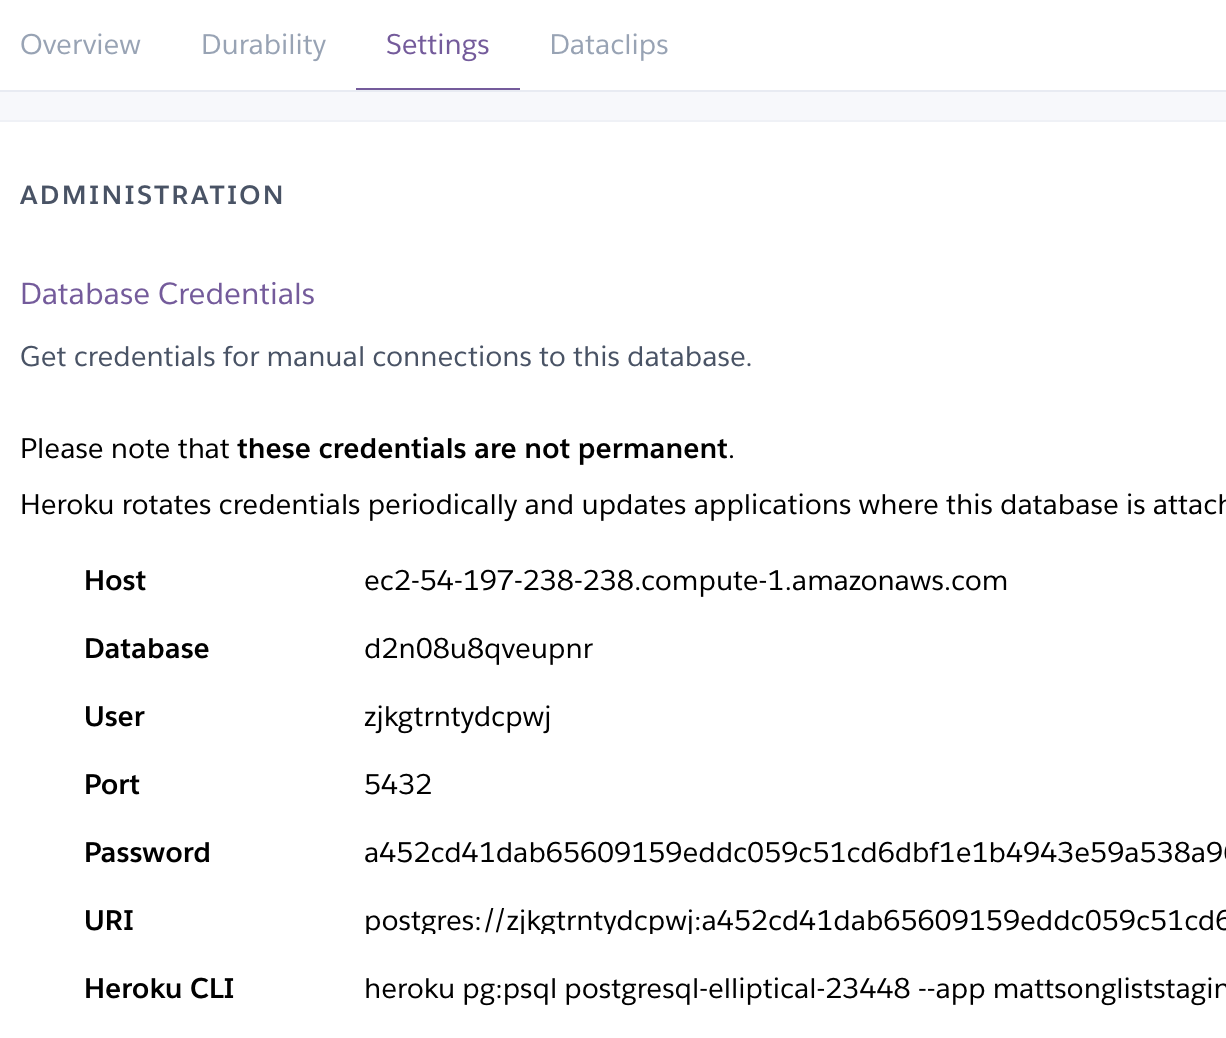
$ heroku config:set DATABASE_URI="postgres://URI_FOURNIE_PAR_HEROKU_POUR_BASE_STAGING" -a votre_nom_app_staging
$ heroku config:set DATABASE_URI="postgres://URI_FOURNIE_PAR_HEROKU_POUR_BASE_PROD" -a votre_nom_app
To sum up: you have your deployment pipeline, with a staging app and a prod app, each with a PostgreSQL database attached, and a production configuration.
One thing is still missing: the file that will hold the scripts Heroku runs, named Procfile (no extension, and with a capital letter — important). Create it at the project root and add the following lines:
web: gunicorn core.server:app
upgrade: python manage.py db upgrade
Heroku will create a “Dyno”, a container holding your application, on which you’ll be able to play with 3 processes:
web: started automatically, it launches your app with a Gunicorn web serverupgrade: which lets you run the database migrations and upgrade.
Let’s test all of this.
$ git add .
$ git commit -m "initial commit"
$ git push origin master
Keep an eye on the tests running and the jobs launching, via the GitLab UI (your project’s CI/CD section). In principle, you should see this:

You can move on to upgrading your database on Heroku:
$ heroku run upgrade --app votre_nom_app_staging
Test it on https://votre_nom_app_staging.herokuapp.com with Postman or curl, on the various routes: /add, /getlist, and /clear.
All good? Then we tag.
$ git tag -a v1.0 -m "v1.0"
$ git push origin v1.0

Once the tests have passed on GitLab and the app is deployed on Heroku, migrate the prod database:
$ heroku run upgrade --app votre_nom_app
https://votre_nom_app.herokuapp.com is in prod, and it works!
Rock ’n roll 🤘
Next article? Why not push Heroku a bit further, with a little Travis CI for a change of pace, or try Github Actions!